Welcome to Medchart!
We are excited to have you join us!
There are a few processes we think you should become acquainted with to get yourself up and running on Medchart: How to Download/Print Authorizations, How to Register Clients, and How to Request Records.
Please take a few minutes to review and reach out to your Customer Success Manager, Angelica, if you have any questions about the processes detailed below!
AUTHORIZATIONS
Medchart boasts the ability, in majority of cases, to use a single authorization for the lifetime of a client's file. We accomplish this by having a copy of the signed authorization uploaded to the client's file to be referenced for each request. The copied authorizations are populated based on each request's information and dated only when submitted in our system. This means that with just one signed authorization, you can place several requests for a client's medical records! Please see below for instructions on how to download copies of the authorizations we support.
How to Download/Print Authorizations
1. Click on the "Dashboard" button at the top of the left navigation menu.

2. Under the Quick Access section, click on the "Download Consent Forms" button.

3. In the pop-up window, select the consent form(s) that you need and press "Print Selected Consents". A file with all your selected blank consent forms will be downloaded to your computer. These blank consent forms are not specific to any client.

4. Print out copies of these blank consent forms and ask your clients to sign only the signature field (this will be marked with a star). Please leave all other fields blank, including the client name, date and witness, as these will be automatically filled by the system when you submit your record request.
CLIENTS
In order to request a client's records, you will need to register them in our system. Doing so will create a profile for them from which you can create and track requests, manage consents and supporting documents, download disbursements, share records, and more!
How to Register a Client
1. Click on the "Dashboard" button at the top of the left navigation menu.
2. Under the Quick Access section, click the "Register New Client" button.
3. Select the type of authorization you will be using for this client, then click Next.

Tip: If a Substitue Decision Maker is signing the consents, please see our article on Creating a Client Who Has a Substitute Decision Maker (SDM)
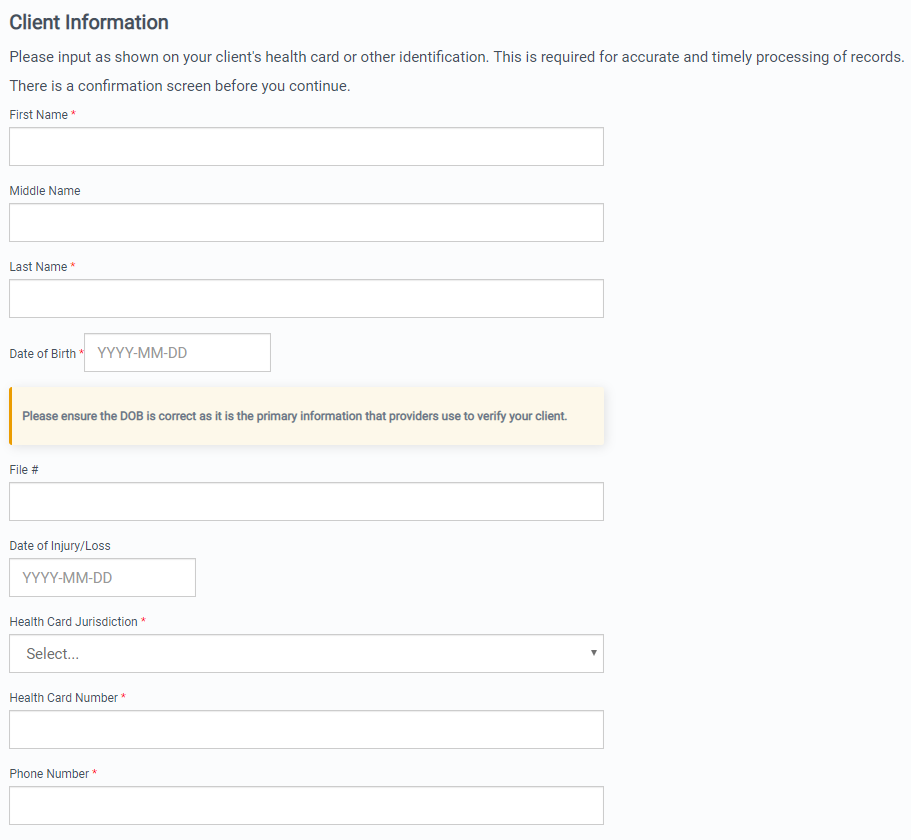
4. Enter your client's information (be sure to enter your client's name as it appears on the health card) and click "Next" and Accept the Terms and Conditions.

Tip: If your client does not have a Health Card, please see our article Creating a Client without a Health Card
5. Review and confirm your client's information. Click Back if you need to edit a field. Click Next if you have confirmed everything is correct. 
*Please ensure that the information on this page matches your client's health card exactly.
6. If you have your client's authorization signed and scanned to your computer, you can upload a copy of it at this point by clicking on the box titled "drop signed consent forms here, or click to choose files." If you do not have a copy, click Skip for now.

7. This client has now been registered on your firm's account!
REQUESTING RECORDS
This is what we are here for! Once you have your client's profile set up, it takes just a minute to create and submit a request for their records.
How to Request Records
NOTE: Your request cannot be submitted until the signed MedChart authorization(s) for your client are on file. If your client is missing the required authorizations, the request will remain in Action Items until the authorizations have been added and you have signed the authorizations as a witness in the portal.
1. Click Clients in the menu on the left-hand side of the screen.

2. Search for your Client in the Clients List and click on their name.

Tip: You can also go directly to your Client's page by typing their name in the search bar at the top of the screen.

3. Click the New Request button.

4. Use the search bar to find the provider.

Tip: If you need to request OHIP records, click OHIP Request. Do not follow the rest of the steps listed in this article. Please reference How to Request OHIP Records for further instructions.
5. Click on the name of the provider you are looking for.

6. Review their details to ensure that the selected provider is correct. If satisfied, click Select.
If any information is incorrect, you can also click "click here to edit" to change the Provider details.

7. Select your Date Range and click Next.

8. Select types of records you want to request and click Next.

9. Optional: Enter notes to the provider, such as record types not included in the previous lists, specific treatment dates, etc.

10. Optional: Urgent Service Add-On
If you require records urgently, click the Add-On Urgent Service checkbox.
Please be aware that marking a request as urgent authorizes up to $300 to be paid towards a provider's rush service fees and the the requested file. If the provider's final invoice is less than $300, your firm will be refunded the difference. Additionally, requests marked as urgent will incur an additional $20 Medchart fee.
![]()
11. Sign & Submit your request or Add to Action Items.

If you choose to Sign & Submit, you will be asked to immediately provide your signature as a witness and then the request will be submitted to our team to process. If you choose to Add to Action Items, your request will be queued for you to submit later.
Congratulations! You have gone through the Getting Started Guide!
If you have questions or feedback, please feel free to reach out to us at support@medchart.ca.